Removal of the stock motor 3S or 5S. Keep the parts organized, you will be using many on the V6 motor.
Things to remember:
Cap off coolent hoses
Protect fuel lines from contaminants and dont loose the banjo bolts and crush washers.
DONT CUT your wire harness, if your using a stock ECU you will be grafting the old MR2 harness into your V6 harness.


Keep the stock starter relay, you may remove the fan control and the stock ECU


The following is exactly the same for 3s or 5s swaps.


When your engine arrives check it over for sludge. Keep in mind some of the V6’es have been in grandmas car and may not have seen much attention.


This motor is a 5VZ but the swap is nearly identical to all other swaps. Notice the complete lack of motor mount on the front of the engine.

This is the 3S flywheel sitting on the 5VZ crank. I suggest replacing the 5VZ flywheel with a 1MZ wheel rather than modifying the 3s wheel.

The 3S-GTE pully fits right onto the 5VZ crank, the 5S pully should too. Remember to RE-mark the 4cly crank pully, the timing marks are in a different location than on the v6

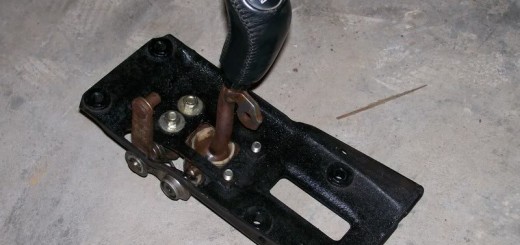
You can not use the 5VZ spacer plate because the starter is on the opposite side. You will need to “modify” the 3S or 5S plate. 

1MZ flywheel with MR2 TURBO pressure plate and disk


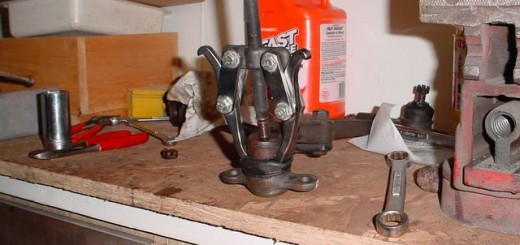
Here you can see an issue with the axel from the turbo transmission and the 5VZ block. There is no mount location for the axel holder. You will need to make an adapter that will bolt into the motor mount location.

Yes you CAN drop the motor and transaxel in from the top, by yourself I would say even the 4.0 v6 should fit through the top.


Here you can see a prototype adapter for the turbo axel. This should give you a good idea of how everything could bolt up without needing to machine the axel  .
.

This is the coolant outlet on the 5VZ. Since its from a truck it faces the wrong way and needs to be cut and reshaped. I used an angle grinder, torch and bigass hammer. EDIT: the plastic 3VZ-FE coolant outlet bolts up and requires no moddification 

Here is the Cummings turbo coolant F pipe that works perfectly as a coolant fill pipe and heater core hose.

Sorry these are blurry but it serves as a warning to everyone planning a swap. You should get your ECU, harness and, engine from the same year. Toyota was nice enough to move some pins around between 96 and 98 so I had to MAKE my own ECU connector with DB25 computer pins and hot glue. Can you say “GHETTO” I think I can 

You can swap all the mount plates from your 5s ECU or 3s to the OBDII ecu and it will mount in the stock location. I have an intercooler pipe running through there so I mounted it on the trunk floor.

Good luck.
Jim
[AndrewMcG]
I thought I would add a couple picks to this thread since I have yet to see any real good pictures of Jim’s motor mount actually mounted on the engine. I had a hard time picturing it until I had one in my hand so I hope this helps somebody.


This documentation in no way replaces the Toyota MR2 Repair Manuals. The purpose of this content is only to provide supplementary information to fellow MR2 enthusiasts. Midship Runabout and its contributing authors will not be held responsible for any injury or damages that may occur as the result of practicing any of the methods or procedures described within this website. Article and photo submissions are property of the contributing author.